Adding accounts
The Accounts page lists the AWS accounts Delegaris reads and controls, and what it manages in each. Only administrators see it.
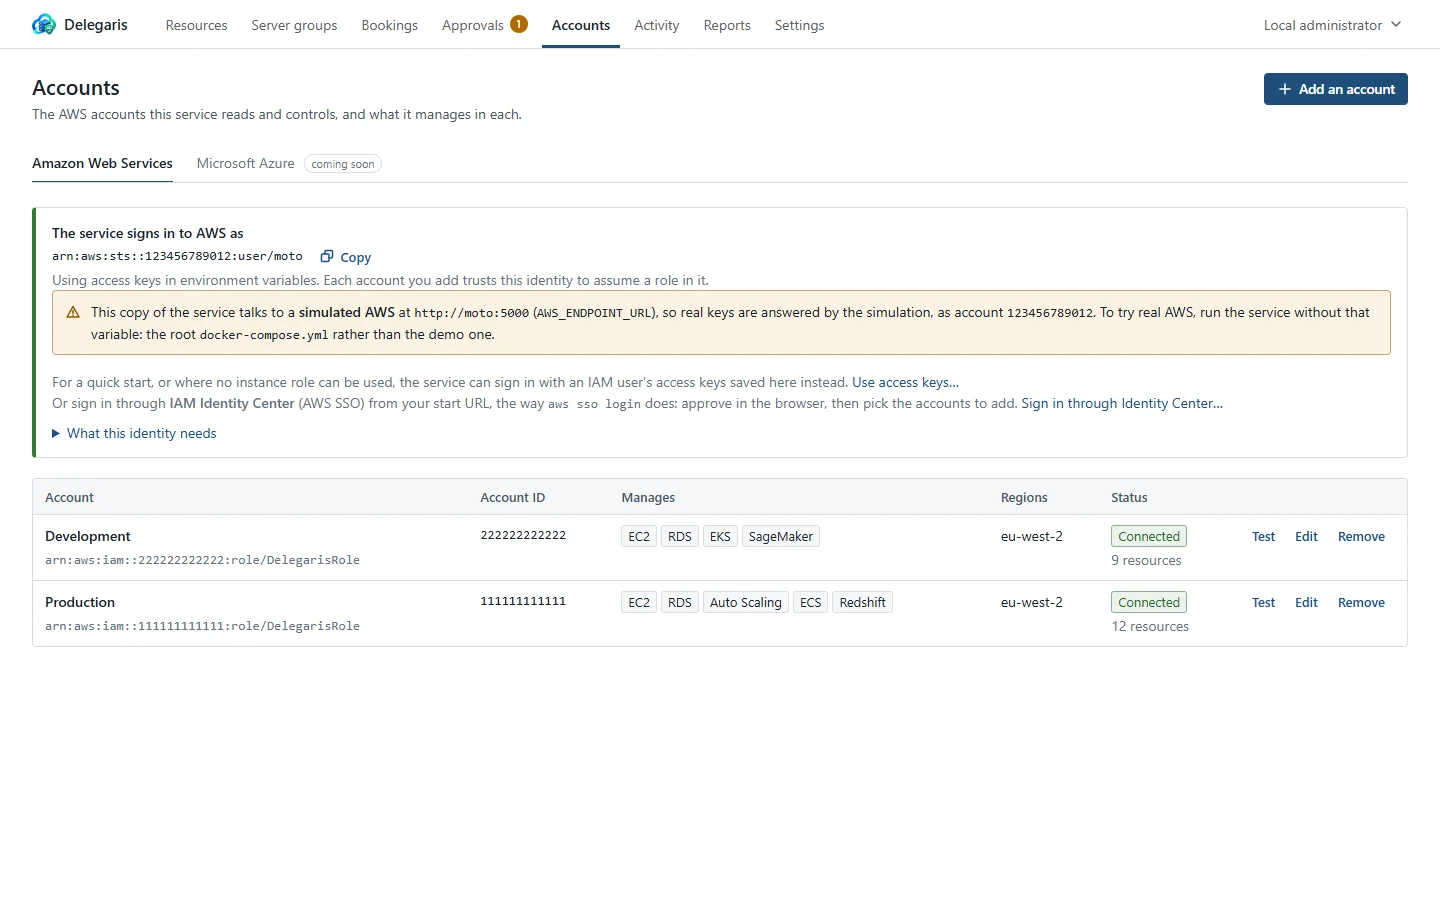
Before adding the first account, check the top of the page: it should say The service signs in to AWS as with an ARN. If it does not, see The service's own identity.
Add an account
Choose Add an account (or Add the first account on an empty page). The dialog has three parts.
Name and account ID
- Name: how people will see the account, for example
Production. Names must be unique. - AWS account ID: the 12-digit number. Spaces and dashes are removed as you type.
Manage
Tick the services to manage in this account. EC2 and RDS, Aurora, DocumentDB and Neptune are ticked to start with. The others are Auto Scaling groups, ECS services, EKS node groups, Redshift clusters, SageMaker notebooks and Lightsail instances. At least one must be ticked.
A service that is not ticked is neither listed nor controllable in that account, whatever the access rules say. See Supported services for what stop and start mean for each.
Regions: type a region and press Enter after each one. Leave the box empty to use the default regions (AWS_DEFAULT_REGIONS, eu-west-2 unless changed); the hint under the box says which they are. A service AWS does not offer in a region is skipped there.
Access
Choose how the service gets into the account. See How Delegaris reaches AWS for the trade-offs.
Assume a role in the account (the normal choice)
- Role to assume fills itself in from the account ID as
arn:aws:iam::<account ID>:role/DelegarisRole. Change it only if you named the role differently. - External ID is optional. If you set one (Generate makes a random one), the role must be created with the same value.
- Create this role in the account gives you the template, the parameter values and a ready-made
aws cloudformation deploycommand for that account. See Member account role.
Use the account's own access keys
An IAM user in this account with the permissions for the services it manages (the policy in the role template is the right one), or temporary keys with their session token. Paste whatever AWS gave you into Paste what AWS gave you, or fill in Access key ID, Secret access key and, for temporary ASIA… keys, Session token. The secret is stored in the service's database and never shown again. Temporary keys expire within hours.
Quick to set up for trying things out. A role needs nothing stored and shows who did what in CloudTrail, so it is the better choice once things are settled.
Through Identity Center
Only offered once the service has been signed in through IAM Identity Center. Enter the Permission set to use in this account, for example PowerUserAccess. Adding accounts in bulk from the sign-in dialog is easier; see below.
Use the service's own credentials
No role is assumed. Only for the account the service's own identity belongs to (the dialog shows which). That identity then needs the permissions for the managed services itself.
Test the connection
Test connection tries what is in the dialog against AWS before anything is saved. It checks, in order:
- Getting in: Assume the role, Sign in with the account's access keys, Sign in through Identity Center as … or Use the service's own credentials. This also checks that the credentials belong to the account ID you entered.
- Listing each ticked service in the account's first region, for example List EC2 instances in eu-west-2, List RDS databases in eu-west-2, List RDS clusters in eu-west-2, List ECS clusters in eu-west-2. A service AWS does not offer in that region counts as passed rather than failed.
Each step shows a tick, or a warning with AWS's message. Under the result it says which identity it connected as, and Everything needed to list this account works when all is well.
If the first step fails with an access-denied message for a role that was created moments ago, wait a few seconds and test again. If it keeps failing, check that the role trusts the service's identity and that the external ID matches.
Then choose Add account. If you added it without testing, the connection test opens straight afterwards.
The account list
| Column | Shows |
|---|---|
| Account | The name, and how the service gets in: the role ARN, Access key and its ID, Identity Center and the permission set, or Uses the service's own credentials |
| Account ID | The 12-digit ID |
| Manages | The services ticked |
| Regions | The regions scanned, marked (default) when the account uses the default regions |
| Status | Connected with the number of resources found (or Nothing found yet); Cannot read with the first problem, by region; or Paused |
Each row has Test, Edit and Remove.
Edit, pause or remove an account
- Edit opens the same dialog. Saved access keys stay as they are if you leave the secret empty. To switch a service on or off, tick or untick it here, and update the role in the account to match.
- To pause an account, untick Read and control this account in the edit dialog. Its resources disappear from Delegaris until you tick it again; the row shows Paused.
- Remove asks for confirmation. The account's resources disappear from Delegaris. Nothing changes in AWS, and access rules that name the account stay in place in case you add it again.
Adding, changing and removing accounts is recorded in Activity.
Adding many accounts through Identity Center
If the service is signed in through IAM Identity Center, the sign-in dialog lists every account and permission set you can use and adds them in one go.
- On Accounts, choose Sign in through Identity Center… (or, once signed in, Sign in again, or add accounts…).
- Sign in as described in The service's own identity.
- Under Add accounts, tick each account to add, adjust Name here and pick a Permission set for it. Accounts already in Delegaris are marked "already added".
- Choose Finish.
Each ticked account is added to sign in through Identity Center with the permission set chosen, managing EC2 and RDS in the default regions. An account that is already in Delegaris is switched to Identity Center instead. Change the services and regions on each account afterwards with Edit.
For many accounts with roles
Delegaris adds accounts one at a time through the dialog, or in bulk through Identity Center. To create DelegarisRole across many accounts, deploy the template as a CloudFormation StackSet; see Member account role.
After adding accounts
Until there is an access rule, only administrators can see anything. Add rules under Settings > Access; see Access rules.